Vanilla JS..Then what?
After working with vanilla JS it was time to move onto React. I must confess I certainly prefer React..I’m still quite new on this journey to becoming a professional developer but it felt like an important step to recognize how I will need to learn to adapt and look for tools that might fit me better. I hope that evolution will lead to interleaving and make me stronger as I progress even though it feels overwhelming right now.
I really like the idea of declarative programming over imperative programming. With reusable components it also feels like playing with legos. React seems to emphasize that principle and makes coding more enjoyable once you get the syntax and flow down. After you have that down you just have to figure out where you want to put those “lego pieces” in your project.
My first Lego set - Search
The concept started to click when I put together the Search feature for a lab/project I was working on. The Search feature involves the use of controlled components. You need to control an input and sync/connect it to a state variable. That way, the program knows what you’re typing into the search input as you type it and you can use the filter method to compare it to the dataset you want to search in.
I will be guiding through the creation of a simple search bar for a React S.P.A (single page app).
First you need to create a state variable and import the search component in the lowest common ancestor component (L.C.A). In this case, the L.C.A is usually App.js but can also be named SomethingElse.js
To be able to create a state variable you will need to hook in useState:

After hooking in useState you will be able to create a state variable and pass it down to your search component as a prop. Remember to declare your state variable inside your components function and the search component and props go inside the functions return.


Your search component should then look something like this:
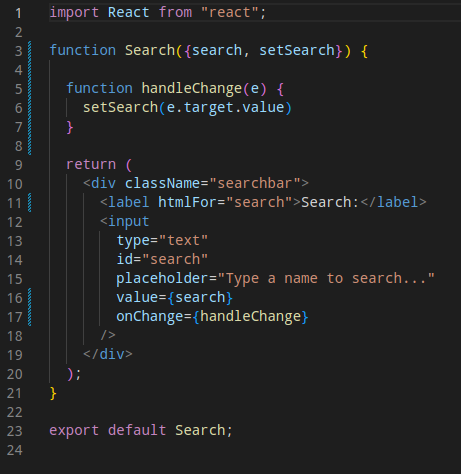
You “gain control” via the value={ } and onChange event. The onChange event invokes the handleChange callback function which in turn uses the state setter function (setSearch) passed down to the search component. You could test this out by adding a console.log(e.target.value) to handleChange. You should see your console capturing everything you type in the search input.
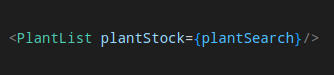
Once you have this working you need to make the search magic happen by implementing the logic to compare your search to the data you want to search. So head back over to your L.C.A and craft your search criteria.
The the example below I am using variables relevant to the lab, I didn’t abstract them to whatever because I think the specific names and context help visualize the logic.

In the example you are using the filter method to take each object (plant) in the array, convert the value in the name key to lowercase and compare that to the search input that is also converted to lowercase (state variable set by setSearch in our handleChange callback). When something in name key matches what you typed in you get a hit.
Displaying that hit from a list that may have already been on the screen is a bit tricky. You need to pass in the variable created for your search logic into the component that displays your dataset/array. This works because when you don’t have anything typed into the search input nothing matches so nothing gets filtered out so you get your full list displayed.
That is how I learned to create my first controlled search input.
NOTES and THOUGHTS I hope this helps someone click with the concepts needed to build a controlled search in React. This helped me learn to approach programming in an almost mechanical way. This approach gives me a sense of confidence when approaching a new problem and I feel like I would be lucky to more of these AHA moments throughout my coding journeys.